
The conclusion of our protests map series is here! This series began with an introduction to the background and architecture of the project, followed by detailed information on the lower-level details and specifications. We then moved on to implementing observables streaming and Firebase Authentication. Now, we are ready to use the Angular Material library to bring our layout to life.
Table of Contents
Add Angular Material
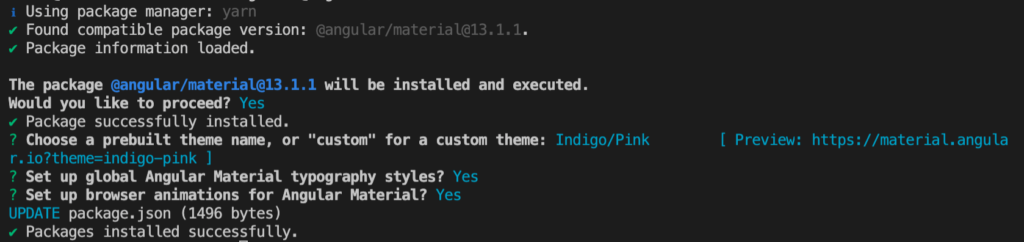
Just as we ran the ng add @angular/fire command the Angular CLI will take you through the material setup by running the following command:
ng add @angular/materialUse the default suggestions by the CLI, so the result should look something like this:
Generate the Layout Module
Once we have @angular/material installed, we can start building our layout components. Run the following command:
ng g m layoutNow let’s import the material’s components that we want to use, and edit the layout.module.ts file as follows:
import { CommonModule } from '@angular/common';
import { MatButtonModule } from '@angular/material/button';
import { MatIconModule } from '@angular/material/icon';
import { MatListModule } from '@angular/material/list';
import { MatMenuModule } from '@angular/material/menu';
import { MatSidenavModule } from '@angular/material/sidenav';
import { MatSnackBarModule } from '@angular/material/snack-bar';
import { MatToolbarModule } from '@angular/material/toolbar';
import { NgModule } from '@angular/core';

@NgModule({
  declarations: [],
  imports: [
    CommonModule,
    MatSnackBarModule,
    MatMenuModule,
    MatListModule,
    MatSidenavModule,
    MatToolbarModule,
    MatButtonModule,
    MatIconModule,
  ],
})
export class LayoutModule {}
Create Angular Material Navbar Component
Use the Angular CLI to generate a new component named `navbar`.
ng g c --skip-tests=true layout/navbarBefore we start editing our navbar component, on the layout/layout.module.ts file, right after the imports array, add the exports array with navbar components:
...
imports: [
    ...
  ],
  exports: [NavbarComponent],
...
This will allow us later to import the navbar component to our AppModule.
Open the navbar component class file and edit it as follows:
import { Component, OnInit } from '@angular/core';

import { Observable } from 'rxjs';
import { UserService } from 'src/app/user/user.service';

@Component({
  selector: 'app-navbar',
  templateUrl: './navbar.component.html',
  styleUrls: ['./navbar.component.scss'],
})
export class NavbarComponent implements OnInit {
  isLoggedIn$?: Observable<boolean>;
  constructor(private userService: UserService) {}

  ngOnInit(): void {
    this.isLoggedIn$ = this.userService.isLoggedIn$;
  }

  signOut() {
    this.userService.signOut();
  }
}
Write the Template
Edit the navbar.component.html so it looks like this:
<mat-drawer-container class="toolbar">
  <div class="navbar-container">
    <mat-toolbar color="primary" class="navbar">
      <div class="navbar-items">
        <button mat-icon-button (click)="sidenav.toggle()">
          <mat-icon>menu</mat-icon>
        </button>
        <a class="logo" href="/">Protests Map</a>
        <div class="sign-out" *ngIf="isLoggedIn$ | async">
          <a color="accent" (click)="signOut()" matTooltip="Log out">
            <mat-icon>logout</mat-icon>
          </a>
        </div>
        <div *ngIf="(isLoggedIn$ | async) === false">
          <button mat-icon-button [matMenuTriggerFor]="help">
            <mat-icon class="more-vert">more_vert</mat-icon>
          </button>
        </div>
      </div>
      <div>
        <mat-menu #help="matMenu">
          <button mat-menu-item>Help</button>
          <button mat-menu-item>FAQ</button>
        </mat-menu>
      </div>
    </mat-toolbar>
    <span class="spacer"></span>
  </div>
</mat-drawer-container>
<mat-drawer #sidenav class="sidenav" mode="push">
  <mat-nav-list>
    <mat-list-item></mat-list-item>
    <mat-list-item>
      <a
        mat-list-item
        *ngIf="(isLoggedIn$ | async) === false; else hoistBlock"
        (click)="sidenav.toggle()"
        href="signin"
      >
        Sign In
      </a>
      <ng-template (click)="sidenav.toggle()" #hoistBlock>
        <a mat-list-item href="/">Hoist a flag</a>
      </ng-template>
    </mat-list-item>
    <mat-list-item>
      <a
        mat-list-item
        *ngIf="(isLoggedIn$ | async) === false; else flagsBlock"
        (click)="sidenav.toggle()"
        href="signup"
      >
        Sign Up
      </a>
      <ng-template (click)="sidenav.toggle()" #flagsBlock>
        <a mat-list-item href="flags">Flags</a>
      </ng-template>
    </mat-list-item>
    <mat-list-item>
      <a mat-list-item (click)="sidenav.toggle()" mat-list-item>Close</a>
    </mat-list-item>
  </mat-nav-list>
</mat-drawer>
Before we import our navbar into our app component, let’s add some style. Open the navbar.component.scss and the following CSS to it.
.toolbar {
  position: sticky;
  position: -webkit-sticky;
  top: 0;
  z-index: 1000;
}

.navbar-container {
  display: flex;
  color: #5F7BAE;
}

.logo {
  position: center;
  color: white;
}

.navbar-items {
  width: 100%;
  display: flex;
  justify-content: space-between;
  align-items: center;
}
That’s it, our navbar is ready to use.
Import the Navbar Component
Open the app.module.ts file, import the LayoutModule and add it to the imports array.
import { LayoutModule } from './layout/layout.module';

...
imports: [
    ...
    LayoutModule,
  ],
...
Add the navbar tag to the app component template, so your app.component.html should look like this:
<html>
  <app-navbar></app-navbar>
  <router-outlet></router-outlet>
</html>

Conclusion
The rest of the Protests Map application code can be found on the GitHub repository. Most of the things are just other components similar to what we have already seen through this tutorial, there is one exception which is the icon registry, a class that enables the usage of custom SVG icons inside the <mat-icon> tag.
It is true that Angular, compare to other frontend libraries/frameworks, has a greater learning curve. But it comes also with the fact that Angular is more than a library. You can build a whole MVP application using the Angular framework and its official APIs.